How to Turn on Advanced Inventory in QuickBooks Enterprise?
Advanced inventory in QuickBooks Enterprise helps the user in maintaining and tracking the stock and also moving the products virtually. This tool can be integrated easily and can also be associated with new software in multiple ways. This can be either bought as a program online or can be garnered in a package under platinum subscription option of Intuit. With this tool the user can easily keep a track of different locations possible.
And also, this allows the user to transfer the items between the inventory sites. To know the process to turn on advanced inventory in QuickBooks Enterprise, the user can read this post ahead.
Benefits of tracking inventory in QuickBooks desktop
Turning on inventory in QuickBooks enterprise can be highly beneficial for the users. The benefits of this include the following:
- This feature makes tracking stock in different locations possible
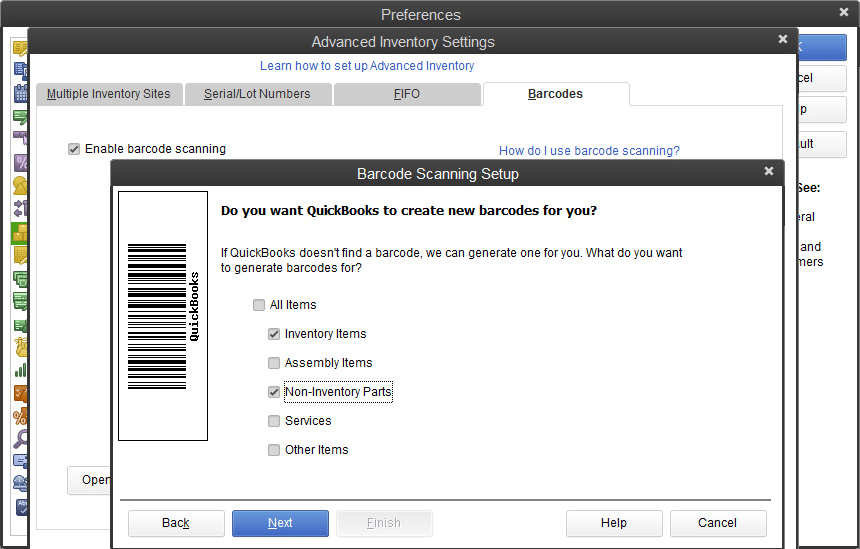
- Also, the user can easily scan the bar-code
- Another benefit can be that it enables the user to track the serial number or lot numbers
- Moreover, the bin location can also be traced
- This feature further allows the user to transfer the items between inventory sites.
Steps involved in turning on advanced inventory in QuickBooks enterprise
There are certain set of steps that can be followed by the QuickBooks users to turn on advanced inventory in QuickBooks enterprise. The steps to be followed here are as follows:
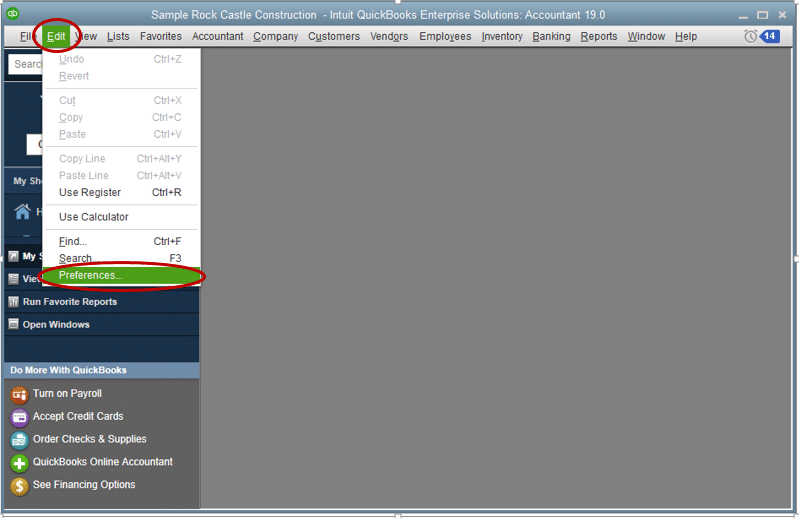
- At the time of operating QuickBooks enterprise, the user will see the edit menu tab. After that, he/she is supposed to click and find preferences under the same. And also press left click on it to select that tab
- As the window pop-up, the user will have to move the cursor to the left panel to choose items and inventory. This will change the right panel
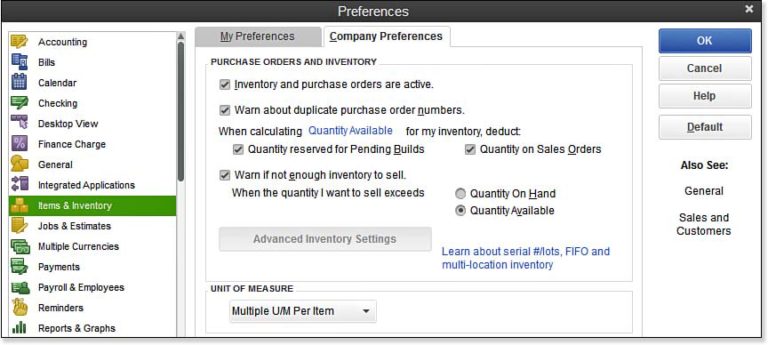
- In the next step, the user will see two divided sections named as My preferences and company preferences. The user is recommended to click on the company preferences
- Now, the window after selecting company preferences will show four sections. At the bottom of the first section, the user will have to click on the advanced inventory settings tab

- After which a new window will appear and after that enable the option of multiple inventory sited is enabled, under the heading of multiple inventory sites.

- The next step is to click on ok tab of the advanced inventory settings window pane.
- And lastly, click on ok tab on the right-hand side of the preferences window pane
This was a quick rundown of the steps involved in turning on advanced inventory in QuickBooks desktop enterprise. If any of you query remained unanswered even after reading the entire post, then in such a scenario you can approach us at 1-800-761-1787.
Our technically qualified QuickBooks enterprise support team members will ensure to clear all your clouds of confusion instantly.
Source URL: https://qbsenterprisesupport.wordpress.com/2021/01/03/turn-on-advanced-inventory-in-quickbooks-enterprise/
Similar Posts:
How to Overcome QuickBooks Error Code 6210, 0?


QuickBooks error 15270
ReplyDeleteQuickBooks Error 1328
ReplyDeleteQuickBooks Desktop encounters several errors where each error is specific to a particular QuickBooks function. Whereas some users also encounter errors that affect multiple actions, one such error is QuickBooks Error 1328. If you are also dealing with the same error, click here and read our article that will guide you to rectify the issue in the least time possible. For quick troubleshooting guidance resolving error 1328, reach QuickBooks support at +1-800-579-9430.
ReplyDeleteCan damage QuickBooks files and inappropriate User Account Control settings lead to QuickBooks Error PS077? Read the linked article to know answers for the same. You can also speak to certified QuickBooks professionals by calling us on our helpline number +1-800-579-9430.
ReplyDeleteIf you wonder what causes QuickBooks error 6073 and how to fix it, there is nothing to worry about. The linked article will give you answers to all your questions. You can also contact the certified QuickBooks professionals by dialing +1-800-579-9430 for immediate assistance to resolve the error.
ReplyDeleteDid you know that you can avoid QuickBooks error 15102 by downloading the QuickBooks and payroll updates in single-user mode? Read the linked blog to learn more about the same. If you didn’t find it helpful, dial +1-800-579-9430 and speak to certified QuickBooks professionals.
ReplyDeleteAn expired payroll subscription and the damaged QuickBooks Desktop application are the leading cause of QuickBooks error PS077. The most effective way to resolve the error is to run Quick Fix my Program from the QuickBooks Tool Hub. You can also talk to certified QuickBooks professionals for the same by dialing our helpline number +1–800–579–9430.
ReplyDelete